ffmpeg로 영상을 자르고 붙여보자
서론
이 글에서 쓰인 코드는 조잡하지만
ffmpeg-testbed 에서 찾아볼 수 있다.
video-editor 를 만들고 싶다고 해보자.
가장 기본적으로 있어야 하는 기능이 무엇일까?
- 영상을 자르고
- 영상을 붙인다
위 2가지 단위가 기본이 될 것이다.
환경 및 라이브러리
- typescript
- ffmpeg-static (다양한 플랫폼에서 쉽게 ffmpeg binary 사용)
- ffprobe-static (다양한 플랫폼에서 쉽게 ffprobe binary 사용)
영상 준비
yt-dlp 를 사용해서 영상을 다운로드 받는다.
나의 경우 bruno mars의 skate라는 노래를 다운 받았다.
# yt-dlp를 alias를 통해 ytdlp로 설정했다
ytdlp -f bestvideo+bestaudio https://www.youtube.com/watch?v=CEw-7cMnBDY
mv "downloaded_filename" skate.webm
Cut (영상 자르기)
설명을 간결히 하기 위해 클립 2개를 쪼개서 붙이는 상황을 가정하자.
input파일인 skate.webm에서
각각 5초길이의 1.webm과 2.webm을 얻어올 것이다.
ffmpeg -i input.mp4 -ss 00:00:00 -t 00:00:05 -c copy 1.webm
ffmpeg -i input.mp4 -ss 00:00:08 -t 00:00:13 -c copy 2.webm
이를 typescript로 표현해보자.
import { $ } from "execa";
import ffmpegPath from "ffmpeg-static";
import ffprobePath from "ffprobe-static";

const ffmpeg = ffmpegPath as string;
const ffprobe = ffprobePath["path"] as string;

const cut = async(
    video_path: string,
    start: string,
    end: string,
    output_file_path: string
) => {
	const res = await $` ${ffmpeg} -i ${video_path}
        -ss ${start}
        -to ${end}
        -c copy ${output_file_path}
    `;
	return res['stdout']
};

async(() => {
    await cut('skate.webm', '00:00:00', '00:00:05', '1.webm');
    await cut('skate.webm', '00:00:08', '00:00:13', '2.webm');
})();
execa가 child_process를 실행할때 현재 project root에서 실행하기 때문에
root 바로 아래에 1.webm, 2.webm 파일이 생성된다.
Concat (영상 붙이기)
이제 1.webm과 2.webm을 붙여보자.
붙일 때는 out.webm이라는 파일이름으로 붙일 것이다.
ffmpeg -f concat -i input.txt -c copy out.webminput.txt ?
ffmpeg 문서 syntax 를 살펴보자.
여기서 영상을 합친 방식은 알려진 방식들 중에서 Concat demuxer에 해당한다.
이는 어떤 파일들을 합칠 것인지 알아야 하므로
input.txt 파일을 만들어야 한다.
파일이름은 상관없다.
# input.txt
file '1.webm'
file '2.webm'
'#' directive의 경우 무시된다.
cut과 concat을 포함해서 typescript로 표현해보자.
import { $, execa } from "execa";
import ffmpegPath from "ffmpeg-static";
import ffprobePath from "ffprobe-static";

const ffmpeg = ffmpegPath as string;
const ffprobe = ffprobePath["path"] as string;

const cut = async(
    video_path: string,
    start: string,
    end: string,
    output_file_path: string
) => {
	const res = await $`${ffmpeg} -i ${video_path}
        -ss ${start}
        -to ${end}
        -c copy ${output_file_path}
    `;
	return res['stdout']
};

/**
 * 기존의 파일이 존재하면 pending이 되므로 시작할때마다 초기화해준다
 * unix 기반 기준이므로 윈도우의 경우 알맞게 조정하자
 */
const init = async() => {
	await execa("rm", ["-rf", "1.webm", "2.webm", "out.webm"]);
};

/**
 * input.txt 파일을 만들어준다
 */
const write_file = async(file_path: string, data: string) => {
	return new Promise((resolve, reject) => {
		fs.writeFile(file_path, data, (err) => {
			if (err) reject(err);
			else resolve(data);
		})
	});
};

/**
 * input.txt 파일을 만들고 concat을 실행한다
 */
const concat = async(output_file_path: string = "out.webm") => {
	const input = "file '1.webm'\nfile '2.webm'";
	await write_file(input_file, input);
	const res = await $`${ffmpeg} -f concat -i ${input_file} -c copy ${output_file_path}`;
	return res['stdout']
};

async(() => {
    await init();
    await cut('skate.webm', '00:00:00', '00:00:05', '1.webm');
    await cut('skate.webm', '00:00:08', '00:00:13', '2.webm');
    await concat();
})();
중간에 누가봐도 명확히 끊긴다.
이건 우리가 원하는 방식의 concat이 아니다.
key_frame 과 pkt_pts_time
이런 현상이 발생하는 이유를 알기 위해서는 keyframe 에 대해 알아야한다.
일단 한번 다음 커맨드를 1.webm에 대해 실행해보자.
ffprobe -show_frames -select_streams v -print_format json=c=1 1.webm뭔가 겁나 출력이 되는 것을 볼 수 있을 것이다.
하지만 이래서는 유용하게 정보를 포착할 수가 없다.
따라서 typescript로 표현해보자.
// ...

const show_frames = async(video_path: string) => {
	const res = await $`${ffprobe} -show_frames -select_streams v -print_format json=c=1 ${video_path}`;
	return res['stdout'];
};

async(() => {
    const res = await show_frames("1.webm");
    // Frame 타입은 따로 정의해둔거라 무시해도된다
	const frames: Frame[] = JSON.parse(res)['frames'];
    console.log(frames);
})();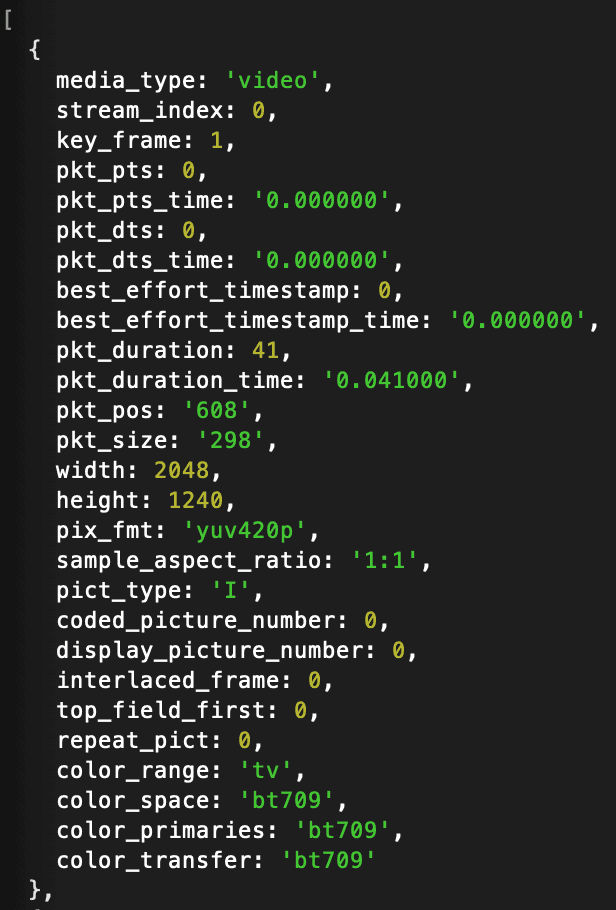
정말 많은 것들이 출력될텐데, 이중 1개의 프레임만을 캡쳐해온 것이다.
우리가 집중해서 봐야할 값은 key_frame 과 pkt_pts_time 이다.
주의: 다음 설명들은 틀릴 수 있습니다.
key_frame은 영상이 시작하는 지점을 의미한다.
가장 하기 쉬운 고정관념이
어떤 영상의 모든 프레임은 시작점이 될 수 있다고 생각하는 것이다.
아니다. 오직 key_frame == 1인 프레임만이 시작점이 될 수 있다.
pkt_pts_time은 무엇이냐?
이것은 해당 프레임이 시작하기까지 걸리는 시간이다.
따라서 우리가 처음에 concat한 영상이
이상하게 나온 이유에 대해서 이제 설명을 해볼 수 있게 되었다.
한번 다음과 같이 2.webm 파일의 첫번째 프레임을 가져와보자.
async(() => {
    const res = await show_frames("2.webm");
	const frames: Frame[] = JSON.parse(res)['frames'];
    console.log(frames[0]);
})();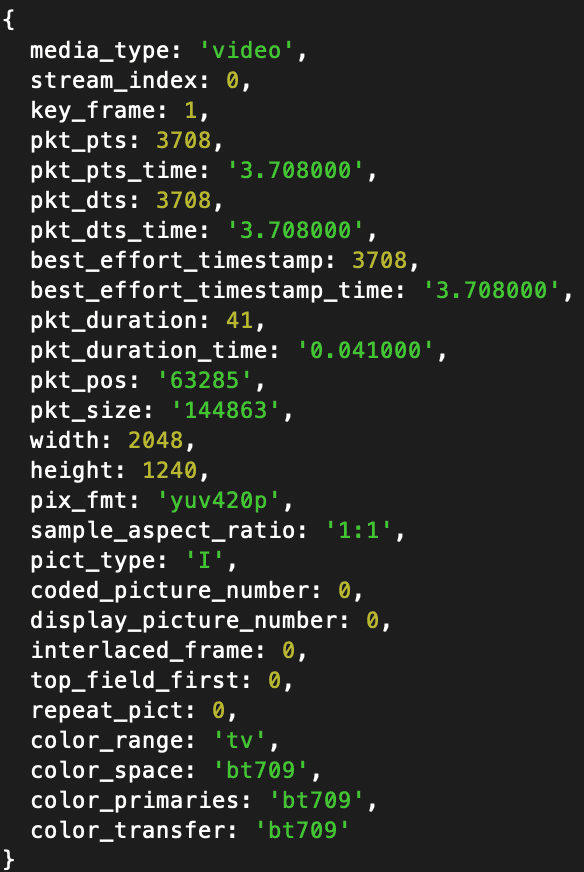
이럴 수가..
2.webm 은 첫번째 프레임이 keyframe이지만
시작하는 순간이 pkt_pts_time = 3.708000 초 뒤였던 것이다!
다시 말하면 concat을 할때 그냥 붙이면 안되고
3.708000 초 만큼 시작지점을 늘려준 뒤 붙여야 한다는 것이다.
그럼 이제 제대로된 concat을 해보자.
// ...

/**
 * js에서 string 끼리 더하는 연산은 상당히 직관적이다.
 */
const string_sum = (a: string, b: string) => {
	return (Number(a) + Number(b)).toFixed(6);
};

const cut_with_keyframe = async(next_keyframe: string) => {
	await execa("rm", ["-rf", "2.webm", "out.webm"]);
	await cut(video_dir + video, string_sum(`${step + interval}`, next_keyframe), `${2 * step + interval}`, "2.webm");
}

async(() => {
    await init();
    await cut('skate.webm', '00:00:00', '00:00:05', '1.webm');
    await cut('skate.webm', '00:00:08', '00:00:13', '2.webm');

    const res = await show_keyframes("2.webm");
	const frames: Frame[] = JSON.parse(res)['frames'];

    /**
     * 2.webm에서 맨처음 시작하는 key_frame을 찾아서
     * 그 프레임의 pkt_pts_time을 가져온다
     */
    let next_keyframe = undefined;
	for(let i = 0; i < frames.length; i++) {
		if (frames[i]['key_frame'] === 1) {
			next_keyframe = frames[i]['pkt_pts_time'];
			break;
		}
	};

    /**
     * concat 하기 전에 다시 올바르게 잘라준다
     */
    await cut_with_keyframe(next_keyframe!);
    await concat();
})();
자른게 맞나 싶을 정도로 스무스하게 진행되는 것을 볼 수 있다.